


-
AutorPublicaciones
-
June 28, 2024 4:26am #31874Click the crossed out circle that looks like a traffic sign all on the right of the icon list. You'll get the option to snooze for 30 days or to remove the image permanently.June 28, 2024 2:41am #31872I try to stay slow even at the first poses, and work methodically through the figure. I vary the exact method from time to time, starting with a different construction for example, (mannequinization versus boxing are my 2 main methods currently), but once I decided the method, I try to stick to a more or less fixed order of what I measure and draw on all the poses. Like, find the jugular, find the solar plexus, connect them, find the lower bound of the ribcage, etcetera...
Deciding the method before I even start the class helps me to prevent hyperfocusing and overworking details early on. I will sometimes use early landmarks to help getting the proportions of the longer lines to match, but the details have their spot on the priority list, after their frame is already firmly established. It's a bit a question of trusting the process. Yes, that particular shadow has a very nice shape, but that shape will still be there, when I am done with construction, and it will be even easier to precisely match it.
My idea is to not hurry the shorties at all, and try to always draw as slow and precise, as if I intended to start a long form drawing.
30 seconds, I am usually not finished with properly constructing the main masses, but 30 seconds for me aren't about finishing anything but warming up to look for the proper lines and indicate them.
1 minute, I have the masses constructed and a first indication of the limbs.
5 minutes I usually have outlines and details of face and hands, and start to look for the shadow edges.
10 minutes usually allow for most of the hatching and details, that almost make the drawing feel finished.
With the 25 minutes+, I must admit, I share your insecurities to some extent. I have done maybe a dozen or so by now, on a lot of days, when I feel, that I am having troubles to get even the 5 or 10 minutes look clean, I won't even bother trying, and rather restart another 30 minutes class. The trigger to go for the 1 hour class is when the 10 minutes look pristine, but still beg for additional detail.
When I do 25 minutes, I am a lot more picky with the reference. I won't spend that much effort on a reference that just feels meh to me, I will skip through references until I spot something that really grabs my attention. Then I will usually slow down even a bit more, like in taking more deliberate breaks to analyze the reference. Around 10 to 15 minutes in, I will usually be done with really every possible detail, and focus on rendering. 25 minutes are usually also enough time to include a background structure of some kind, to give the pose a semblance of being at an actual location, not hovering in mid-air on a white page.
I have finished so far a grande total of 2 (two) 35 minute poses. The decision to go for longer poses isn't 100% deliberate, it comes when I have a phase, when at the end of 10 minute poses I repeatedly discover, that the construction still is precise enough to allow for more detail. If I tried to start one right now, it would become a frustrating mess, and I would probably abort the attempt way before the timer runs out.
The 50 minutes and 1 hour+ stuff to me at the moment still feels like science fiction. I guess, at some time in the future I will be confident enough with the 25 and 35 minute poses to push on, but sadly I can't phone future me, and ask me, what to look for in those.
And, off course, all of the above is only true on a good, productive and focused day. A lot of days, I will end up changing the method with every whim and produce just a lot of messy pages. I guess, that is why some people call drawing a spiritual exercise, you get to learn a lot about yourself.June 26, 2024 5:22pm #31852Yes, the shift went great, as in "I don't remember a lot". It was weekend, though, so had I had two shifts a day the next day, too, and was quite sleep deprived and left in a bit of a manic mood, when I first read your reply. A state of being which is actually quite helpful to get the shifts done, and process long lists of clearly predefined tasks, but isn't a good mindset for a serious conversation, as the grandiose terrorist in my head will be all in control and constantly running off on tangents, that will be quite confusing to everybody. As I would love to keep the conversation going instead of scaring you and any potential reader away, I decided to postpone my answer until I could catch up on a bit of sleep and mellow down a bit.
My theory so far, given that spending a lot of time drawing be unquestionably a good thing.
I observe that I have a hard time drawing for more than a very limited time per day, while I don't seem to have the same problem spending time on other tasks. Also, obviously people exist, that are able to focus for hours every day on drawing without suffering from my issues, namely including pretty much everybody, who can actually be called a professional artist to some extent.
So a prime curiosity for me is, what is the critical difference between those tasks? Why do I feel too tired and confused to continue drawing, let alone upkeep an amount of focus that is necessary for quality in one case, while I can pretty much partmentalize and ignore exhaustion in a structured work environment, or even anticipate at least a promise of relaxation and relief when it comes to computer games? If demand avoidance plays a role (which it likely does), why does it trigger in one case, when I try to execute self chosen, creative, highly autonomous tasks, but not in the other case, when I just unquestioningly process taks, that are almost completely externally determined, either by my job description or a game designer?
What is the actually exhausting part of drawing, and can I change something about it, so it stops being exhausting? Does both working shifts and killing pixel tanks provide extra incentives to overcome that exhaustion, that I am missing out on in designing my creative tasks?
I love your suggestions to look for greater purpose, self expression and fun, as they are very naturally appearing and intuitive. I just don't think they can really work, as they all rely in a hidden way on outside circumstances.
Let's start with fun, inspiration, joy. Great to have them, but what do you do, if you don't "feel" them? Take a break, hope for them to reappear on their own term, divert to some other task to provide you with the "fun" you need to execute your art? Pharmacological enhancement, family therapy or spiritual exercises to get back in touch with your "real self"? All of them have one thing in common, they pretty much focus on NOT drawing.
What about finding the fun in work itself, from getting into the flow?
Yes, but experience shows, that work flow does not start with having fun, it starts with working, whether you feel like it or not, trusting the process, and then experiencing how the process succeeds. You don't go from fun to success, the direction has to be from process, then success, to fun, or everything bogs down and you just end up in stagnation and frustration, and in a consumer mindset, that will at some point put you in the situation to pay for all the outside input that you need to consume. Needing carrots to keep going always has the drawback, that carrots aren't free.
Self expression is a term often associated with art. There is that behavioristic explanation, that we were born as completely helpless infants, and the first vital skill we have to hone is to garner other people's attention to our needs. In extrapolation artists are mere crybabys, that can't stop investing immense effort into getting seen? I see that as a flawed diagnosis. That is what narcissism is about, not art. And while being an artist and a narcissist certainly aren't mutually exclusive, they just aren't exactly the same either.
The difference between a mere narcissist and a functional artist is, that while the narcissist sees themselves as the sole important center of the universe, the artist is keenly aware of the competition. All of them. 8 billion living people, who want to express themselves, about as many or a few more deceased persons (I am not so sure how the exponential math works out on that) and a hard to estimate amount of people yet to be born before the heat death of the universe. That's a lot of crybabies, and that makes infant cries ultimately mindnumbingly annoying and boring, unless you have already an emotional bond to the specific child in question.
I think skill in art is far more important, and I will introduce an example from a youtube video. Just a person, stacking empty plastic cups to a pyramid. But they do it incredibly quickly. Objectively an incredibly useless skill, and it doesn't really express a lot of personality, as all speed stackers share pretty much the same range of motion, at least as far as an outside viewer could discern. But if you see a speed stacker for the very first time, you still can't look away. Because it seems so highly implausible, that a human being could do it at that speed. The feeling for the unsuspecting observer is pure awe. The very emotion, that Augustinus starts his proof of divinity with, the perception of an existence beyond your own finite scale. It looks inhuman, supernatural at first glance.
And I do postulate, that everybody that has even a fleeting interest in art has had that exact feeling of awe when looking at someone else's masterpiece. Michelangelo's David? No effing way a human being could turn a slab of rock into THAT!
Art at its core isn't about trivial Freudian goals of impregnating the old lady that once gave birth to you, or killing the old chap, that broke his back paying your bills. Art is about killing God and impregnating the universe, and that is not a quantitative shift but a whole different quality. Art is not about expressing boring old "self", but about transcending it. It is also a scam, because no artist ever truely became more than human, but boy o boy, are master artists adept at pretending.
Now, I admit, this is an extreme take. Do you want to kill God, just because you crotchet a particularly nice blanket for your loved one? And my answer is still. kind of yes, the difference is only in the scale of peers you take into account. If your interest is limited to impressing a tiny group of people, that already know you, then breaking their current expectance of you is fully sufficient to produce that feeling of awe. "I would have never thought they could do that, I certainly can't" But the temptation of art keeps scaling. People adjust their expectations, and you have to up the game to keep impressing them, and even if you have a particularly complacent group, that has already accepted, that you regularly display some superhuman abilities, then you yourself will get bored with your audience and look for a more demanding one. In extrapolation it will always become grandiose, as there is never a boundary that will tell an artist, that they succeeded and can rest now.
Self expression without skill isn't art. It's just boring and inflationary. Some audiences got confused by 20th century avantgardists, who apparently suceeded with "naive unskilled" expression, but they never truely abandoned the measure stick "skill", they just discovered a whole new set of skills to explore, and to flabbergast people with.
Phew, I must point out, that these are my thoughts, when I am not in a manic episode, so once more the reason why I took a bit time to mellow out, before I answered. I am still afraid it might scare people away from reading through my rants.
Now, to the third part of your answer, overarching purpose versus specific technical exercises, and for my explanation why I currently prefer focusing on one over the other I have to mount down from that mountain of grandiosity and return to the very practical lowlands of having that pen in your hand, that reference and paper in front of you, and suddenly feeling far too tired or distracted to proceed.
I still don't completely understand, why and how that exactly happens. I haven't got a working theory yet, just observations from experience.
I know, I can work all day, because I do not keep reflecting about the general purpose of my work. Paying the bills is axiomatic. Following the bounds of my job description as I am contractually obligated. All the tasks that derive from those axioms follow automatically, to quote Kraftwerk: "We are the robots". Exhaustion, tiredness, distraction may occur, but ignoring them is just one more skill I acquired during my professional training.
I can certainly waste incredible amounts of times in video games, and again, the question of purpose is almost completely excluded. Achieving that digital badge, completing that arbitrary collection, earning bragging rights before a group of people, that I will never see in person, and going from the way they interact on the internet probably would neither like nor respect as persons? How is that important? But as long as I can keep ignoring the question of purpose, I can tirelessly perform the mentally quite demanding tasks that are required to get high scores or special titles.
So, yes, you are absolutely right, that the answer I am looking for must be somewhere in the dichotomy between task and purpose. Just, purpose doesn't seem to be the solution, apparently it is the main problem.
As long as I succeed in ignoring all doubts about purpose, I can turn into a highly productive automaton, find my salvation by immersing in the process, be autonomus from outside demands, transcend the banality of my biography and neurological setup, leave the grandiose terrorist inside my head happily in charge of operation.
Until doubts about purpose emerge, and leave me staring blankly at the equally blank page in front of me. I don't like that. How can I overcome it once and forever?June 23, 2024 11:36pm #31831Hi Jolty Beans. Great, that you fixed that imgur link. Scrolling through your sketches was the perfect start to my after-work hours today.
First impression: great, clean lines, always a good start!
Second impression, aww, that one is cute. And that one too, and that one!
You clearly succeeded in depicting most of those critters with very few lines, and you clearly know how to take all the liberties with the reference to max the effect, chosing a focus, simplifying the heck out of shapes, and cropping everything that could distract. Good convincing move, I'll consider thieving that from you and sacrificing the OG frame on the reference more often to celebrate my own best lines, instead of always being completionist and including every outstretched finger and toe for every pose.
On a few of those images I had the suspicion, that you went quite far with the liberty, and straddled the line from drawing from reference towards drawing losely inspired by reference, but hey, I am not gonna snitch you out to the art cops.
Presentation: the strong anime frame acts as a nice contrast to the a bit more naturalistic-ish style of the series, contextualizing the reductionist nature of your shorties, and emphasizing the fun you had while drawing. Also a good choice, that wouldn't have immediately come to my own mind.
Lots of fat thumbs up from me, looking forward to see more of your adventures in future.June 22, 2024 4:27pm #31822Yeah, thanks for the reply. I know the drawing for the trash can idea. I got the special perk, that my hoarder syndrome kicks in in regards to my drawings, so I can report that I can add all the stacks of Din A4 paper in my room to about a total of 1 meter in height, plus another stack of about 30 cms of Din A3. Functionally it is the same though, as I am pretty certain, that all those papers will stay untouched until the day either I or someone else decides it's time to move them to the next recycling station.
I mean, for me trying to be honest with myself will always have to include being ready to be critical with my actions. And if I purposefully look critical at my drawing habit, I can see a lot of at least ridiculous aspects. Purposefully devoting hours per day to staring at a screen and scribbling on paper isn't exactly a fulfilling way to satisfy social needs. It might be well a classical symptom of an avoidant personally type. Dreaming about ever "mastering" the craft and being recognized for it is pretty clearly a grandiose narcissist phantasy.
But then, all critic is incomplete without considering the alternatives, and well... I realized about a decade ago, that I am definitely an addictive personality. Joined Narcotics Anonymous, quit the drugs,... except coffeine and nicotine and industrially processed sugar and electronic media,... well, I at least quit alcohol and the illegal stuff. But then I realized, that when I am sober, I just don't enjoy being around other people. It's not a problem of social skills, I work as ambulant nurse, and have to manage a whole lot of drama on my shifts, and from the feedback of my patients and co-workers, I am fairly competent at it. Just, given the choice, I prefer not to.
According to NA dogma, addiction is ultimately caused by the God sized hole in ourselves, that wants to be filled. The same idea from a more philosophical point of view, with a distinctive atheist and existencialist bent, our behavioral instincts are bound to function according to a purpose. Just that there is no objective "purpose" to be found in the material world, and we are both free and damned to make up our own. (shoutout to Sartre, R.I.P.)
So, art, drawing.... why not? The dream of achieving mastery may be grandiose, and the chance to ever succeeding in my lifetime may be small, but it's probably still a better chance than in buying a lottery ticket every month, and defintely cheaper.
Let's go beyond asking the question why gaming is more seductive than practicing drawing skills as a rhetorical device, and try to set maximizing time spent drawing as axiomatic goal, that shall no longer be questioned.
Is the frustration of failing our artistic goal for a drawing the problematic part? Frustration is definitely a constant companion while honing our skills, maybe an inevitability, that can never be overcome. But then, ruining a good drawing with a few mismeasured lines is defintely a lot less embarrassing than piloting the highest tier heavy tank in a World of Tanks match, and getting booed by the whole team for being sniped in the first minute without even connecting a single shot myself, and that amount of shame did not stop me to continue tanking.
I know, that I am also capable of working a total of 24 hours of shift in 48 hours time, and between proccessing Hamburg's heavy car traffic, and switching on the fly to soothe all the minor and major ailments my patients struggle with, that certainly also generates a whole lot of frustration.
I think the difference between that and drawing, is the little sibling of the big allmighty purpose, the small and actual task at hand. Whether in gaming or in working shifts, there is always a clear task for the next minute, and the next and the next. I might fail at the task, I might even misunderstand the task, but I never have the urgency to come up with a new task on the spot, as I always feel certain what the task is.
In art, there is always a million possible tasks to chose from. Do I simplify the pose, mannequinize, box in the perspective, measure precisely or exaggerate in big lines, is it time to define more landmarks to get the big proportions correct or is it better to just eyeball the proprtions directly and fill in the details later? Sometimes, all too rarely, I get in the flow, and the task at hand becomes so clear, as if the reference just dictated it.
I think at least for me the next step in maximizing my time spent drawing is understanding the process of setting tasks while drawing better.
Well, next actual task for me, my late shift is about to start in an hour and a half, and I definitely have to get in a power nap before that.
While I don't enjoy spending time with people, I do enjoy trying to formulate elaborate thoughts in writing, and I also enjoy reading other people's thoughts on a subject, so, maybe this thread will grow even longer, either from more ideas from myself, or from other people chiming in with their thoughts.June 22, 2024 4:51am #31820Hi joiy.
Good that you found back to the drawing board. I like the simple shapes you settled on. Your focus on proportions works, the relation between head, torso and legs is natural.
One thing, that I am just not sure about: did you draw the figure diagonally on purpose? It could kind of make sense, but there is a bit of a doubt, as the diagonal tilt could also be caused by starting boldly with the tilted shoulderline, and then being tempted to stiffen the pose by "adjusting" the central axis to reduce the impact of your initial decision.
There would be two tips that would derive from that:
a) work with a "plumbline", that is, make sure, that points on the figure that are directly vertically aligned on the reference stay directly vertically aligned on the drawing.
Typical points to look out for on an upright figure are, for the head, the tips of the jaw and the nose, to find the center line for the face, for the upper torso the jugular and solar plexus, which determine the orientation of the ribcage, for the lower torso the belly button and the crotch, which indicate the position of the hip. Imagine a vertical straight line through the figure and observe how much these points are to the left or right of it.
and
b) try to understand to how much of a degree the shoulder joints are independent of the upper torso and their range of motion.
Your base construction for the upper torso at the moment seems more or less a flat rectangle, which is a bit the worst of two approaches.
For basic underlying shapes, I would recommend mentally separating the upper toso into ribcage and shoulders. The best form for the upper end of the ribcage is the top of an egg. The very top of the egg connects to the neck exactly at the jugular, where also the collar bones start, that connect to the shoulder joints. Off course the shoulders obscure most of the eggform of the ribcage, but keeping it in your mind's eye makes the analysis of that body part much easier.
There is an idea to reduce most of the body forms into boxes, to get more into a perspective view, but the thing about boxes is, that they are there to indicate three dimensionality, and even if you had that in mind, the rectangle you chose is still flat, and also, perspective drawing does not change that the shoulders have a degree of individual freedom from the ribcage.
On another note, I think you should spend a bit of warm up time practicing long straight lines and clean curves. Just put two points on the paper, not too close to each other, hold your pen just above the paper and repeatedly move your hand like you were drawing (make sure, neither your wrist nor your elbow is resting on a surface, so you initiate the movement from the shoulder) until you see a shadow of the line appear, then draw the line in one motion exactly straight and exactly from point to point. The focus should be completely on the fine coordination of all your muscles involved in that movement.
For practicing curves, just draw clean circles freehand. Repeat every circle twice without stopping. Draw circles in both directions. When your circles over time become cleaner, and you want to spice it up, draw random uneven crosses, and start matching them with ellipses.
It's not that your line quality is absolutely horrible, but it isn't great either, and the earlier you start practicing line quality, the less you have to retrain later.
Just a few minutes of this stuff before the start of every drawing practice will make a world of difference in how you move your pen in a relatively short time.1 1June 20, 2024 3:45pm #31815I hit my 300 hours spent drawing on this site today. I also checked my old account on quickposes.com, where I have 13 days, 20 hours, which should be 332 hours total if my math doesn't fail me. I went through the drawabox tutorial for the first 5 lessons, including all the challenges, and worked through a Figure drawing course by proko. That should be at least 200 more hours on total. The I spent quite some time "urban sketching", but it is a bit hard to divvy up, how much of that time was spent wandering around, and how much I actually had my pen hit paper, but I'll take 100 hours for that.
So, probably I spent 1000+ hours drawing in the last 5 or so years. There is this urban myth, that it will take 10.000 hours to achieve mastery. At my current pace, that would take until the year 2060, and I'll probably run into natural decay of my mortal shell by then, as I would be close to 90 years old.
If I could increase my time spent drawing to an average of 3 hours a day, I could get there in mere 10 years. If I matched 6 hours a day, it would be less than 5 years. But at the moment I barely manage to do 3 hours a day under ideal conditions, on my days off, when I am in productive mood, and nothing distracts me, on so many other days I barely manage to get to the end of a 30 minutes class.
Then I look at my account on World of Tanks, a game that I quit, because of the toxic community, and I had 15.000 games on it. With an average of maybe 10 minutes per game, that's already 2500 hours of my life wasted there, and I am not even good at that game. And WoT isn't the only game, that is tempting me, and let's not talk about all the hours just staring at you-tube videos with glazed eyes.
What makes it so hard to spend time on improving myself, instead of consuming entertainment?June 14, 2024 2:53am #31769thereisnogestureinfacesthereisnogestureinfacesthereisnogestureinfaces.... human beings just don't gesticulate with their noses or eyebrows! Unless we are talking about elephants or octopods, there is no gesture in facial expression!-
 Aunt Herbert
edited this post on June 14, 2024 12:06am.
Aunt Herbert
edited this post on June 14, 2024 12:06am.
-
Aunt Herbert
edited this post on June 14, 2024 12:06am.
June 13, 2024 1:04pm #31765Heads work quite differently from poses, as the proportions of a head are very uniform. The big shapes of a head with an angry face and the shapes of a head with a crying face or the shapes of a head with a laughing face are still basically the same.
This is, why there are various abstractions of famous artists, that have defined such shapes and proportions.
Andrew Loomis:
Frank Reilly:

Henry Bridgman:

Steve Huston:

John Asaro:
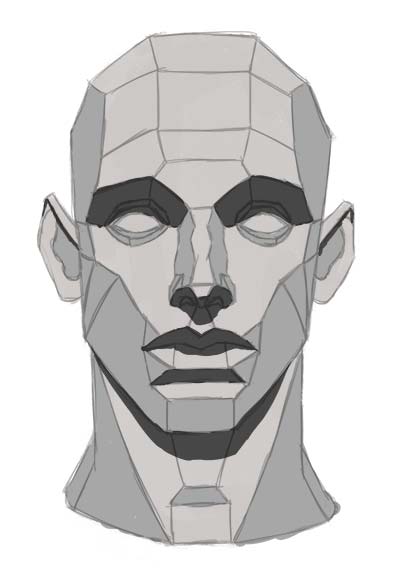
or even japanese industry style, which sacrifices natural proportions for style, and is mostly shared by a lot of japanese artists, look for Manga or Anime style:
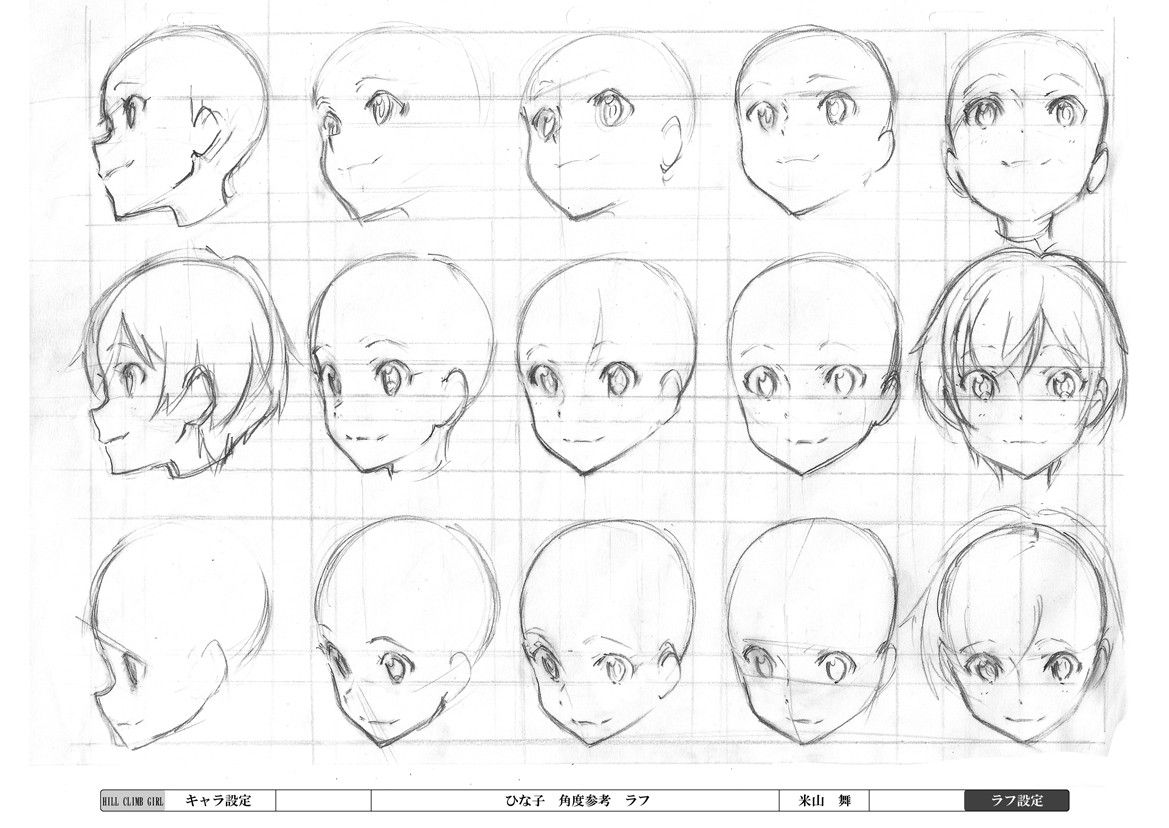
The problem is, that in drawing faces and heads, other than with poses, you generally don't start with capturing the emotion, but instead you use the idealized form of a human head, and mostly only change the direction in which it is looking. The emotional expression of the features isn't really part of the big simple shapes you draw in the first minutes, these are basically treated as rendering details, that are added on top of the human head.
Memorizing at least one of the abstractions above is really helpful for drawing heads or faces. You don't have to sketch it out in all details at the start of every drawing, but the process of drawing such an abstraction will teach you which proportions and shapes to measure and uphold, even when drawing "freehand"
Most popular abstraction for general purpose is Loomis, because it is simply the easiest to learn and good enough for 90% of basic drawing needs. You will find more detailed tutorials for each of those abstractions all over the web, by just using the names as search words.-
Aunt Herbert
edited this post on June 13, 2024 10:10am.
-
Aunt Herbert
edited this post on June 13, 2024 10:17am.
-
Aunt Herbert
edited this post on June 13, 2024 10:21am.
June 13, 2024 11:50am #31764Polyvios, sorry, this wasn't an answer to your post. But the post I originally answered to has obviously been deleted by its author. But there still isn't gesture happening in the face, in the face it's called mimic or facial expression, and it's called differently, because it actually also works differently than gesture.
The features of the face just aren't limbs, they aren't connected by joints, and they don't use massive changes in silhouette to communicate an action or a feeling. Tiny differences in muscle movement can make a giant difference in emotional content of an expression. Fear and laughter, anger and bewilderment, sadness and boredom, those expressions are so close to each other that a lot of people seriously struggle to tell them apart when actually talking face-to-face with another person.
Yes, an artist, who is able to differentiate between such subtle nuances with as few lines as possible is certainly recommendable, but just forcing yourself to capture such nuances in 30 seconds from random photographic references won't teach you how to find the exact decisive lines, that are needed.
I understand what you are saying and mean about the goal. I just think that in this case short timed drawings are the absolutely wrong tool to achieve that goal, and are actually a trap. You see what I am saying and mean? I don't disagree about your intention, but about the proposed way to get there.
Gesture is about big and bold movement, it's like a hammer, while mimic or facial expression is about little precise movements of tiny muscles, more like a screwdriver.
There are similarities between a nail and a screw, but the old saying that if you only know about hammers you treat everything as a nail is still true.
And this certainly not about you personally Polyvios, I am so invested because that very misconception, trying to learn facial expressions the same way as gesture is best learned, is so often thrown around by people, who just aren't very good at drawing faces.-
Aunt Herbert
edited this post on June 13, 2024 8:57am.
June 12, 2024 11:42am #31757What is the gesture of a face? Between gesture and mime, mime is generally associated with faces. And mime isn't defined by big motions, but by subtle details.
If someone is "gesticulating wildly" with their cheeks, nostrils, and eyebrows, it's time to call the ambulance, as they might be suffering from a seizure.
Also, the big shapes and proportions of all faces are generally the same. You can practice them, but you don't need specific reference for them, as there is no big change in silhouette. For studying the shapes and proportions of faces, it's useful to just drill abstractions, Loomis, Reilly, Bridgman, Huston, or even japanese industry manga faces if you prefer that style and favor expression over realism... but hurrying them doesn't improve the practice, as they are by their nature as abstractions already idealized.
Look, I am not asking you to show how you would do it, as that would be arbitrary and unfair, depending on your amount of practice you had. But find anyone, who is good at portray drawing OR caricature, who teaches starting face drawing from quick sketching at a pace of a minute or less. Sources from the internet, sources from literature, anything.
Most people have conscious control over their jaws, lips, cheeks, nostrils and eyebrows to form an expression, but the motion of the facial muscles is extremely minute compared to the muscles of limb and torso. And there is general consent in the art community, that it is good practice to draw from big to small. Timed practice from reference with faces would mean, you deliberately practice starting with tiniest details. It's a trap, don't do it.
If you want to use this site to practice drawing faces, don't use the "class" feature, use the "all the same length" feature, and chose at least 5 minutes or 10 minutes, or use the self defined length and enter 3600 seconds.
There is still the same risk of getting lost in spending oozes of time rendering a flawed construction, but other than in poses, you can't just avoid it by putting yourself under time constraints. You have to know about it, and use self discipline to stop yourself, when you go into rendering mode, while your constructtion is still flawed.-
Aunt Herbert
edited this post on June 12, 2024 9:06am.
-
Aunt Herbert
edited this post on June 12, 2024 9:27am.
-
Aunt Herbert
edited this post on June 12, 2024 9:58am.
-
Aunt Herbert
edited this post on June 12, 2024 10:07am.
-
Aunt Herbert
edited this post on June 12, 2024 10:20am.
-
Aunt Herbert
edited this post on June 12, 2024 10:22am.
June 10, 2024 12:09am #31747I definitely love your focus on clear and crisp shapes. I think you have an incredible effective way to inform about shape and posture on a glance, and I think the silhouette is strong enough, that you could even scale them down to very tiny depictions without losing any of that message (That is not meant as an actual suggestion for you to do, just as a mark of quality, that you could do it.)
At the moment you are basically using blue as a substitute for black, staying in a digital mode. And I must totally admit, that I can't tell you much about truely dipping into multi-color, as I have been postponing that step time after time.
I occassionally took a look into tutorials, and it's just a whole new can of worms compared to "simply" drawing,, with local colors modified by the color of reflected lights, decisions about saturation and using greyscales to harmonize color composition, new forms of contrasts, emotional "meaning" of individual colors or specific combinations of colors, deciding about a unified palette of colors for diverse effects.... maybe I shouldn't have looked so closely into all of the possible aspects, because now I am scared.
One name I remember from a guy who does great work with gouache and explains his thoughts while doing so was James Guerney on youtube.3June 4, 2024 12:14am #31710I think you are running into a typical problem: You try to solve the whole figure from amassing lots of details, but you don't have an underlying system to organize proportions and relations.
It will work kinda for a while. If you can focus well, you can compare all the relevant relations between two details, between three details, four details,... but with everything you add, you also add a new artistic decision, which you have come up on the spot, and therefor have to keep in the back of your mind. And at some point, you are just bound to lose track, and suddenly the one detail, which should be in a direct vertical line under that other detail just isn't, and the one detail, which should be approx. twice as big as that other detail just isn't, and there are some lines in your drawings, which you just no longer remember why you drew them, and the lower bound of your shoulder joint connects to the upper bound of the biceps instead of the lower one....
You said you bought a book about anatomy for artists, and just stared at the details. Yeah, I remember being pretty much in the same situation. The problem is "anatomy" isn't "anatomy", and being inspired to juggle even more details doesn't help you with your proportion problems. What you need is a hierarchy of anatomical landmarks, so you can sketch out the big proportions quickly and correctly, and only then start to fill in all the pretty details.
We had someone here on this page a long while ago, who actually used such an anatomy for artists book in the right way, and it was jawdropping to see. They had a very crisp and abstract mannequin of the human form, a box for the booty, line of action connecting it with the box for the ribcage, and the circle for the head, joints indicated, tubes for the limbs, whole human form done in purely primitives, but always with just enough lines to indicate the third dimension. The pose of the abstract mannequin exactly matching a reference photo. Then they used their anatomy for artists book to exactly identify a specific group of muscles and drew them onto their mannequin, trying to observe exactly, how those muscles stretched, bent, contracted or expanded on the reference.
So, that pretty book you have isn't exactly useless, it is just like you grabbed a math book about calculus, while you are still struggling with the concept of basic multiplications.
Learning to start with determining the scale of big forms before you focus on detail work is pretty much a universal concept in all of drawing, landscape, still life, portraits, poses, graphic novels, giant murals or tiny newspaper adds. In drawing poses this means getting used to the proportions and scale of motion of the human torso and head and limbs, until you really stick to them automatically, and no longer have to spend your mind on measuring them out painstakingly and constantly remembering all the relations you designed for your current drawing.
And the efficient way to get to that point isn't by starting with loooong paintings, that will just exhaust your focus and never get finished. You say 30 minutes is too short? Try to use that time to draw 60 30 second "poses", not hurrying, but just practicing finding the first 3 or 4 lines in a calm drawing speed over and over, and you probably learnt way more from that. (Actually, doing half an hour of 30 second shorties is a bit too painful. Just use the class option in the menu, the slightly longer sketches that follow will give you feedback about the purpose of your shorties, as the goal of every shorty is to be the perfect start for an epic longform work)
And yes, Proko has been mentioned already, so let me add to the cultish fanboy atmosphere, to point out one of his older courses, the one that I followed several years ago: https://www.proko.com/course/figure-drawing-fundamentals/overview
I can say, it did work for me. The pricetag for the premium course seems steep, but Proko has a bit of a strange pricing model. All the essential informations are in the basic course, the premium course seems more like a huuuge buy-me-a-coffee option, that rewards you with a bit of nice bonus material. I did buy the premium stuff, after I finished the basic course, not because I felt it was lacking and needed something extra, but because I had the money and considered the value of what I had already learned to be in a fair relation with that amount of money. So, my recommendation, do the basic course, decide for yourself if you ever want to pay for the premium.2May 31, 2024 11:13pm #31696A short tip, and it is so short and simple, that it sounds stupid, but when I had my urban sketching phase I found it incredibly relevant to repeatedly remind me while drawing:
MAKE SURE VERTICAL LINES ARE ACTUALLY VERTICAL WHEN DRAWING THEM!
I mean, OK, if you decide to draw the scene at an angle, then they are obviously diagonal, and if you go for extreme prespectives, there can be considerations, too. But I caught myself constantly losing the vertical out of a simple mistake. Usually on the left side of the page, they were still vertical, while towards the right side they started to tumble over, just because it was biomechanically more convenient to pull the pencil directly towards me. (I am right handed)1 1-
Aunt Herbert
edited this post on May 31, 2024 8:15pm.
May 30, 2024 12:30pm #31686A bit of a strange question, but no, you aren't obligated to anything at all, unless someone pays you big monies for drawing one way and not another way. And to convince anyone to ever pay you monies, you first of all need to be able to draw stuff, that looks cool. If someone needs a perfectly realistic depiction, they will probably ask a photographer, not a draftsperson. Heck, as you are still working from a photographic reference, they can just use the reference instead!
If anything, you are obligated to make stylistic choices. That is what sets you apart from a xerox machine or a cheap filter software. The end goal is to be able to make them consciously and deliberately, and to keep your stylistic decisions consistent enough to let the viewer intuitively understand and appreciate them.
Talking about looking cool and your ink and watercolor drawings: Yes!!! A thousand times yes! This looks way cooler than your too smooth graphite gradients. These shapes are quick to pick up, and they convey all the informations about the body in space, that you were formerly losing with your blended transitions.
There is one thing you could try: Buy yourself grey ink. Then draw the darkest values in black ink (like you did) and the middle tones in grey ink, and you are automatically forcing yourself to break down the figure into 3 values. If you watch any tutorial about rendering, this separation of the object into three distinct values will ALWAYS come up at some point.
If you want to check out a really classical (and classic looking) impression, you can aim for the rule of thirds, and try to approximately match your darks, middletones and brights in size of area over the whole painting. It's ofc just a rule, not a law, but if you get it done with nice shapes your results will be on a whole new level.
(Footnote: You should never break a law. You should never break a rule, unless there is a specific, obvious, and undeniable reason to break it. There are generally no laws in art, but the rules you obey define you as an artist.)
If you aren't planning to hit the art supply store anytime soon, you can substitute the grey ink for any watercolor of your choice (blue is perfectly fine) Just try to keep the application of the watercolor as uniform and flat as possible, so you achieve a clean separation of darks, middletones and brights. Focus on shapes and lines alone, and don't get tempted back into gradients for now.
Practice this first, and you will already achieve a smooth, but not boring, looking and deliberate finish. Once, if ever, this separation really becomes so second nature to you, that you get bored of it, then you can progress by for example replacing the mono-valued planes with hatching or crosshatching, or to start breaking down the figure into even finer shades of gray, so you can approximate your graphite gradients without losing information, or you can start to investigate color theory to dip into full painting.
Tried to put the theory to practice. This is how it looks when I do it (Not so happy about the linework today)
1 2-
Aunt Herbert
edited this post on May 30, 2024 9:57am.
-
Aunt Herbert
edited this post on May 30, 2024 1:26pm.
-
-
AutorPublicaciones
-
1 1
-
Aunt Herbert
edited this post on June 14, 2024 12:06am.
-
Aunt Herbert
edited this post on June 14, 2024 12:06am.
-
Aunt Herbert
edited this post on June 13, 2024 10:10am.
-
Aunt Herbert
edited this post on June 13, 2024 10:17am.
-
Aunt Herbert
edited this post on June 13, 2024 10:21am.
-
Aunt Herbert
edited this post on June 13, 2024 8:57am.
-
Aunt Herbert
edited this post on June 12, 2024 9:06am.
-
Aunt Herbert
edited this post on June 12, 2024 9:27am.
-
Aunt Herbert
edited this post on June 12, 2024 9:58am.
-
Aunt Herbert
edited this post on June 12, 2024 10:07am.
-
Aunt Herbert
edited this post on June 12, 2024 10:20am.
-
Aunt Herbert
edited this post on June 12, 2024 10:22am.
1 1-
Aunt Herbert
edited this post on May 31, 2024 8:15pm.
1 2-
Aunt Herbert
edited this post on May 30, 2024 9:57am.
-
Aunt Herbert
edited this post on May 30, 2024 1:26pm.
-
