
-
AuthorPosts
-
February 1, 2013 4:41am #834Hi LyMoraine,
it's good to know there are more of us wanting to run this marathon. I just finished my 100 drawings (in 136 days) and I am feeling so much more confidant about my skills.
Keep posting your work here. These very motivated posters (in this forum) are few of the reasons I managed to complete this project.
Join the club!January 31, 2013 2:59am #832My bad for the late response
There are a ton of exercises under these five topics. Here is one example site that covers a bunch of the listed topics http://www.learn-to-draw.com/drawing-basics/default.shtml
Our very own Kim covers a bunch of topics too https://line-of-action.com/category/technique/January 4, 2013 3:35am #808The good - solid work, anatomy sizing feels pretty decent. Im assuming that these are from the photo references. Good work on the textures used. Decently defined hands (#2)
Areas you can improve
Try and draw towards the center of the page, so that the drawings are not cut off (ref 1, and 2) always keep that area around the drawing for expansion.
Go easy on the shading, keep it at a lower value as compared to the outlines. Shading helps define the shape of the muscle with the value of light.
Would like to see more faces
Ignore shadows (like the shadow of the feet in #4)
the more you practice, the lesser short strokes you'd use. This helps keep the outlines finer, cleaner and have a consistent thickness
Lucky-o-besto to you, Mondoman!1January 4, 2013 3:24am #807Total death-grip I used to get this earlier, treating my stylus like a pencil and pressed down hard (Glad the latest versions of the Wacom come with a high degree of pressure sensitivity).
Worry that I might develop the wacom-carpal tunnel-syndrome (or whatever).
I try and hit that pause button after each drawing and take a break.
January 4, 2013 3:15am #806@Joe - Welcome to the club!
@Cassidy478: That's right, start from the basics. If you can, grab a copy of Betty Edwards' "drawing from the right side of the brain". It's a good eye opener to creativity, approach and understanding art. If you decide to be a bit more adventurous and explore the interwebs, then try the following in order
Straight lines, curve lines and mark making (hatching)
Positive and negative spaces
Contour drawing (and Blind Contour)
Values (shading)
Perspective (one point, multi-point)
Human Anatomy
a) Faces
b) Body
c) Hands
d) Feet
Poses
Animal Anatomy
When you are feeling a lot more comfortable with basic drawing, try human and animal anatomy. Poke around pixelovely.com's own <a href="https://line-of-action.com/category/technique/">tutorials and techniques</a>. There are sites like http://www.drawspace.com/ where you can create a free account and post your progress for others to evaluate.
Art is a skill. And like any other skill, the more you work on it the better you get. So keep practicing!
December 11, 2012 4:35pm #795December 10, 2012 12:48am #793December 10, 2012 12:15am #792@illographer, Yes, working off photo references help me reinstate the basic anatomy lessons learned. I think I am going to try and do more of those.
@Lucian: science fiction is a fun theme. i'm looking forward to your art.
I remember coming across a good read on Gesture Drawing for Animation by Walt Stanchfield. I think you might like that.
@Finn, strong poses, dude. Keep up the good work
I finally hit 75 pieces early this month to take a break from work and stuff and pondering on the next theme for the last 25 drawings.
Updates coming soon
Keep the force strong everyone!
bye
November 15, 2012 4:53am #756Keep up the good work, @robbjosf. Always good to start with the basics. Try and create a blogspot/tumblr account to archive your art so that you always have a reference point of your progress.
@Vyse - always good to see your art from imagination. Man, I'm still fudging figures from photo references. I'll get there one day.
@sylvester_hansen - dude, love the quality of work you are churning out
@Key Master Kim G - I do understand you are held up with work. Hope you get some free time around thanksgiving, kickback and draw some expressive faces
______
I've been making smalls steps and <a href="http://elbowgreasedraw.tumblr.com/archive">archiving</a> my progress. I have covered most of what I was learned from Michael Hampton's book to finish them goals. Thus I have moved on to poses with more details (like hands, feet and simplified faces) and shall stick to this theme till I hit #75
Here are my most recent works <a href="http://elbowgreasedraw.tumblr.com/tagged/100-drawings">http://elbowgreasedraw.tumblr.com/tagged/100-drawings</a>
November 11, 2012 6:02am #749I have to say both inked drawings came out pretty well. IMHO, I would always try and save my originals and using a trace sheet and transfer the inked versions to another sheet
 1November 11, 2012 5:24am #748yo, some degree of politeness is just what the doctor ordered.
Kim G runs this joint, <a href="https://line-of-action.com/forum-rules/">Respect the admin</a>November 10, 2012 12:59am #745Hi A_A
Muscles around arms (and legs) can get pretty confusing, since they sometimes contour around the limbs. These muscles too me sometime to understand, but I'm no where from being good. So here's my take on this request
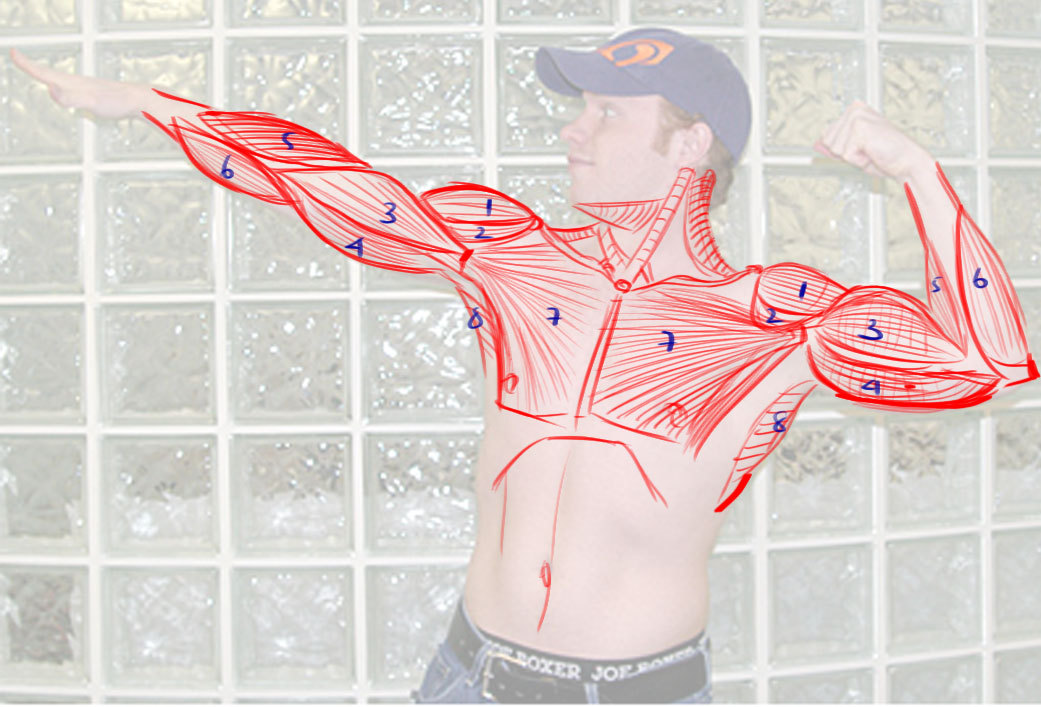
I have been learning anatomy from <a href="http://www.amazon.com/Figure-Drawing-Invention-Michael-Hampton/dp/0615272819">Michael Hampton's book - Figure Drawing | Design and Invention.</a> There's a pretty in-depth chapter on arms that you might find interesting.
Here are some more images fore reference<strong> <a href="http://elbowgreasedraw.tumblr.com/image/34753844857">one</a>, <a href="http://elbowgreasedraw.tumblr.com/image/34695660393">two</a>, <a href="http://elbowgreasedraw.tumblr.com/image/34621211134">three</a>, <a href="http://elbowgreasedraw.tumblr.com/image/34620707834">four</a>, <a href="http://elbowgreasedraw.tumblr.com/image/34558271968">five</a>, and <a href="http://elbowgreasedraw.tumblr.com/image/34407780492">six</a></strong>. Some of these image are drawings taken from the figure drawing bookNovember 8, 2012 2:47am #738aargh anatomy <a href="http://elbowgreasedraw.tumblr.com/image/34749623660">of</a> <a href="http://elbowgreasedraw.tumblr.com/image/34749961001">the</a> <a href="http://elbowgreasedraw.tumblr.com/image/34892851908">legs</a> is a bit frustrating.. but on the bright side, here's #<a href="http://elbowgreasedraw.tumblr.com/image/35192560156">36</a> and <a href="http://elbowgreasedraw.tumblr.com/image/35197879251">37</a>October 22, 2012 10:05am #685Status updated: <a href="http://elbowgreasedraw.tumblr.com/image/34013461711">34</a>, <a href="http://elbowgreasedraw.tumblr.com/image/34020606642">35</a>, <a href="http://elbowgreasedraw.tumblr.com/image/34014808216">36</a> and <a href="http://elbowgreasedraw.tumblr.com/image/34015460469">37</a>.
@sylvester_hansen: as mentioned earlier, I tried working on that method of avoiding line art and using only shades of color for depth. I think I am getting the hang of things. I like the direction where that's heading
@Vyse. Just a little mis-communication. No biggies. We coolOctober 20, 2012 1:13pm #680<strong>Status update:</strong> Here are some of my more recent stuff <a href="http://elbowgreasedraw.tumblr.com/image/33533994213">27</a>, <a href="http://elbowgreasedraw.tumblr.com/image/33535897730">28</a>, <a href="http://elbowgreasedraw.tumblr.com/image/33541304965">29</a>, <a href="http://elbowgreasedraw.tumblr.com/image/33763493535">30</a>, <a href="http://elbowgreasedraw.tumblr.com/image/33764517217">31</a>, <a href="http://elbowgreasedraw.tumblr.com/image/33885714807">32</a>, <a href="http://elbowgreasedraw.tumblr.com/image/33948735230">33</a>
I have started working on muscles around the front and back upper body.
in response to Vyse<!--more-->
<em>So. I took my time to read this now. I’d agree with most of it, but I have a few remarks to make:</em>
<blockquote><em>[…]</em>
<em>Restating your lesson plan </em>
<em>1. Better Proportions</em>
<em>2. Better connections between limbs and torso</em>
<em>3. Better anatomical details</em>
<em>4. Learn to draw from imagination instead of references</em>
<em>The above lesson plan covers all that you need in the right order of being a better artist.</em>
<em>This lesson plans does leave out a few things like types of mediums to use, or rendering style or presentation, all of which could make your art unique. </em></blockquote>
Dude, I didn’t plan to be perfect after these 100. Why would I restart? <em><strong>(restating, not restarting) </strong></em>Isn’t the whole point of this to improve in certain areas and NOT focusing on everything at the same time? After the first 100 there will be the next 100 with new possibilities, until then I’ll stick to my plan.
<strong>That post was just a suggestion, take it or leave it. <em>No hard feelings.</em> </strong>
<blockquote><em>My three pointers for you.</em>
<em>1. Ignore render style for the moment. The plan is to improve your anatomy skills. Once you have hit your goals, then move on a new lesson plan to work on rendering skills or play with different mediums (digital, oils, pens, mixed media, etc)</em></blockquote>
You just said I should restart<strong> (refer first comment) </strong>my plan and consider rendering styles @_@ That comes later @_@
I was agreeing with your lesson plan. Ignore rendering styles like colors, tones, shadow, highlights, etc. or mediums like paint, water color etc. (When the time comes, the medium will most likely be tablet pen on Wacom board and the render style will be realistic first and manga later)
<blockquote><em>2. Do this lesson plan for you and only you. If’ you are uncomfortable showing it to anyone, don’t. If you do make it public and work better under the pressure of your peers asking how much you have done, that’s fine too. But make it a point to document your progress, archiving it online or offline.</em><em>I strongly say this because time and again, it’s necessary to go back to your first drawings and see how far you have progressed. This self evaluation will keep you motivated.</em></blockquote>
Well you have seen my tumblr blog, haven’t you? ô.o <strong> yup, your feeds popup on the dashboard. good progress so far</strong>
<blockquote><em>Now with respect to #4. Learn to draw from imagination instead of references.</em>
<em>Drawing from imagination is bloody tough, but you only get better with practice.</em>
<em>My art always turns out pretty ugly the first time. I erase or delete so many times till I get it the way I like. I used to see artists draw live and shietz, these people were soo skilled! It was very intimidating to see some one soo skilled just make something out of thing air. It was only later that I realized that these artists use <a href="&feature=plcp">techniques</a> and practice drawing similar pieces, a ton of times before doing it live/publishing it.</em>
<em>ok, bye bye</em></blockquote>
At the moment 70% of what I draw is from imagination and only a few figures are drawn from books and pictures. I usually mention it in the picture if I drew a figure from a book. As I said, I feel like I only learn how to trace the lines rather than the way things work if I do that. It might come in handy for details like facial expressions and stuff like that, but for now I try to do as much as I can from memory by constructing the figures. What I do instead is, that I look at references for different topics and then try to iplement those in my drawings. I usually start by copying one or two images from a book, but after that I try to work from imagination most of the time.
Finally I’d like to suggest to you to stop using the eraser, at least until you’re done with the drawing. You are erasing your line of reference and you’ll have a harder time finding the right line with the next stroke once the “wrong” one is erased.
<strong>I use the eraser tool, only because I draw digitally and can. I do hide most of my reference layers, wire-framed body, muscle structure layers in Photoshop and export the end product. Sometimes I drop the opacity of those layers to <10%.</strong>
<strong>I should try and avoid using the eraser though. </strong>
-
AuthorPosts


